Quick Tip #5: Getting the Right Spotify

The Issue:

Spotify is compatible with Linux, but they’ve been a little bit lazy with it.   If you followed these instructions for the “stable” version https://www.spotify.com/us/download/linux/.  But don’t let the name fool you, it’s the least stable version.  Even the logo is wrong.  It’s not one logo change behind, but two whole logo changes behind.

If you found the “testing” version (working) here https://community.spotify.com/t5/Spotify-Community-Blog/Spotify-Client-1-x-beta-for-Linux-has-been-released/ba-p/1147084 you got the right version!  But it’s missing a step of the installation!!!

The Right Way:

sudo apt-key adv --keyserver hkp://keyserver.ubuntu.com:80 --recv-keys BBEBDCB318AD50EC6865090613B00F1FD2C19886
echo deb http://repository.spotify.com testing non-free | sudo tee /etc/apt/sources.list.d/spotify.list 
sudo apt-get update
sudo apt-get install spotify-client

Quick Tip #4: Protect your Firefox

The Issue:

Web browsers are very susceptible to viruses, malware, spyware, etc on ANY OS!  Firefox comes with most Linux OS’s and this tip helps you keep the fire burning.

Note: This works on all OS’s with Firefox.  Windows, Mac OS, etc.  PS. Macs CAN get viruses!!!


Solution: Get Security Add-ons

Two add-ons solved security for me.  Ad Block Plus (ABP) and No Script

  1. Getting the add-on
    1. Open Firefox and click those 3 lines at the top right 3lines
    2. Click “Add-ons” in the menu that appears ff_addons
    3. Search your Add-ons with the search bar that appeared at the top firefox_search_addons_searchbar
    4. Click the install button and you’re done! noscript


Ad Block Plus abp

This guy does basic protection and skips annoying Youtube ads!  Get it, leave it on, and don’t need to mess with it

No Script noscript_logo

No Script is like the Great Wall of China.  It initially blocks EVERY url, until you permanently or temporarily white list that url.  This sounds easy, but it’s extremely tedious and requires a lot of research; however, once your list gets large enough, it’s not bad.

How I do Security:

I always leave ABP on and usually turn off No Script.  But when I’m using sites I don’t know/trust I turn No Script on because I’m usually just interested in and need to approve one url (like the text or video).  To turn it on, click the logo then click “Forbid Scripts Globally (Advised)” or “Allow Scripts Globally (Dangerous)”.  By the way, that “Dangerous” notice means it’s dangerous to turn off if you have no other security, so don’t freak

Quick Tip #3: Power Management Workaround

The Issue:

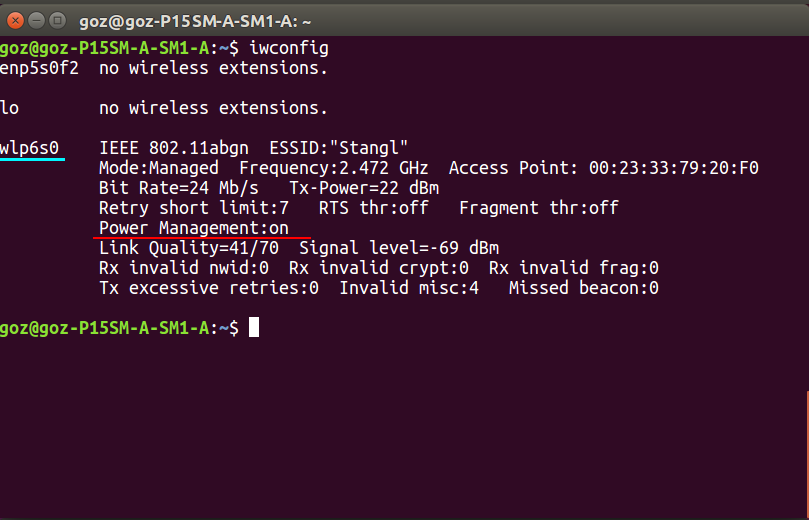
If you enter iwconfig into the terminal, you might see a line saying ‘Power Management:on’ like in the picture below.  Power management prioritizes battery life over Internet speed, which seems like a logical fallacy on someone’s part.  There’s a quick way and a long way to correct this problem.  But if your’s says Power Management:off, don’t bother reading this.  You’ve been blessed by Linus Torvalds.

powerManagementOnTerminal

The Quick Way:

sudo iwconfig wlp6s0 power off

That’s the command that gives me fast Internet.  But for you it might be different.  Enter iwconfig and copy what it says in the left column next to IEEE.  Replace wlp6s0 with whatever yours says and enter the command.  Now remember to do this every time you boot your computer or try out the long way.

The Long Way:

sudo gedit /etc/bash.bashrc

Just like in Quick Tip #2, scroll down to the bottom and don’t mess with the code that’s there.  The following shell script should be the absolute last thing in this file.

#wireless fix
iwconfig > iwconfig.txt
clear
if grep -q Power\ Management:on 'iwconfig.txt'; then
 echo iwconfig power management is currently on
 sudo iwconfig wlp6s0 power off
 echo iwconfig power management is now off
fi

Don’t forget to replace wlp6s0 with whatever yours is named, just like in the quick way.  Save that file and from now on, you will be prompted to enter your password the first time you open your terminal.  This is so you can give root privileges to the command “sudo iwconfig wlp6s0 power off” and turn off Power Management.


The Deets:

For those of you that would rather know exactly what that script does instead of blind copy and pasting, here’s my line-by-line

Line 1: > specifies where output goes in Shell.  Here, > puts iwconfig output into the text file iwconfig.txt

Line 2: clear clears extra output from being displayed in the terminal

Line 3: There’s a couple things going on here:

  • if – starts an statement.  If this, do the following.
  • grep – grep searches a text file for a string (a word).  In this case it searches iwconfig.txt
  • -q – this stops grep from outputting other things to the terminal.  This argument is optional
  • Power\ Management:on – This is the string we are searching for.  Since Shell uses white spaces to separate arguments, ‘\ ‘ denotes a white space inside one argument.
  • ‘iwconfig.txt’ – this denotes the file grep is going to search.
  • ; – marks the end of the condition needed to trigger the if statement
  • then – denotes what to do when the if statement occurs

Line 4 and 6: echo prints everything following it in the terminal.  Like a note


Line 5: This turns of power management, just like above.

Line 6: fi simply ends an if statement in Shell (if is fi backwards, how clever).

Quick Tip #2: How to Make an Alias

Making an alias:

alias name-of-alias=’insert shell code here’

Example:  alias veggetti=’echo Yay, Veggetti!’

This will print ‘Yay, Veggetti!’ every time you enter veggetti into the terminal.

Note: There are no white spaces on either side of the equals sign. The alias command only applies to the terminal you created it in and is lost when the terminal is closed using the above method.


Making an alias permanent:

  1. sudo gedit /etc/bash.bashrc

    • This command opens bash.bashrc.  This is a script that gets run as soon as you open the terminal and before you can enter any commands yourself.  Adding the alias here, makes them permanent.
    • WARNING!!!!!! There should already be code in this script.  DO NOT TOUCH IT!  Instead, scroll to the bottom and enter your aliases after all of it.
      • If you didn’t know/listen the first time you, you might need to timeshift
    • gedit is just a text editor.  You can use nano, leafpad, vim, etc instead
      • Use ‘sudo apt-get install gedit’ to install gedit
  2. Write your aliases
    1. Use the same format as the above example
    2. Copy and paste veggetti to test it
  3. Save bash.bashrc
  4. Open a new terminal and test your alias!

More Examples/Recommendations:

  • alias make-alias=’sudo gedit /etc/bash.bashrc’
    • make-alias will open the bash.bashrc so you can make more aliases whenever
  • alias big-up=’sudo apt-get update && sudo apt-get -y upgrade && sudo apt-get -y dist-upgrade && sudo apt-get -f install && sudo apt-get -y autoremove && sudo apt-get clean’
    • big-up uses Shell’s logical AND && to execute a series of commands
    • -y skips the confirmations so it runs it all without stopping


Labeling your Aliases:

In shell (the language of bash.bashrc), you can comment with # (a pound sign aka hashtag aka tic-tac-toe).  I recommend using a comments to label your alias section and describe complex aliases.


Stylistic bologna I have to mention (Not really that important though):

Including the argument sudo in the aliases is sort of frowned upon and might confuse some newbies.  Instead, aliases are stylistically supposed to omit sudo.

  • alias up=’apt-get update’
    • To run this alias, enter  sudo up
  • alias up2=’sudo apt-get update’
    • To run this alias just enter  up2

Either way you need root privileges, need to type your password, and there are no differences in performance.  It’s all stylistic and really up to you